Parshvottanasana pose is also known as the pyramid pose, but also as an intense side stretch pose. The pose itself leads to a lengthening of the upper part of the body at the moment when the practitioner bends down the upper part of the body. When performing the pose itself, a slight external rotation of the hip rotor occurs. There is also a fine stretching of the gluteal muscles, hamstrings, and lower back.
The pyramid pose can also be classified as a balance pose, given that by practicing it, the practitioner improves their sense of focus.
HOW TO PERFORM IT AND ITS BENEFITS
Parshvottanasana certainly does not belong to the basic yoga poses, having in mind the fact that the practitioner’s body should be “open” in order to fully perform the pose itself. However, like most poses in yoga, this one has its variations. Accordingly, there are variations of this pose that you will be able to practice if you are not yet able to perform the full pose.
In order to perform the pose correctly, the practitioner should develop a good external rotation of the hips. A good hamstring stretch is also very important for a strong lower back and finely stretched glutes. A developed sense of balance is essential to perform this pose.
If all of the body’s parts are not ready to perform this pose and the practitioner lacks a developed sense of balance, I recommend the following poses: Baddha Konasana,
Gomukhasana, Adho Mukha Svanasana, Prasarita Padottanasana, Uttanasana, and Virabhadrasana 3. You can practice these poses in addition to a variation of the pose itself that I will point out later.
In order to perform the pose properly, it is important that the landing leg is fully active.
What does it imply?
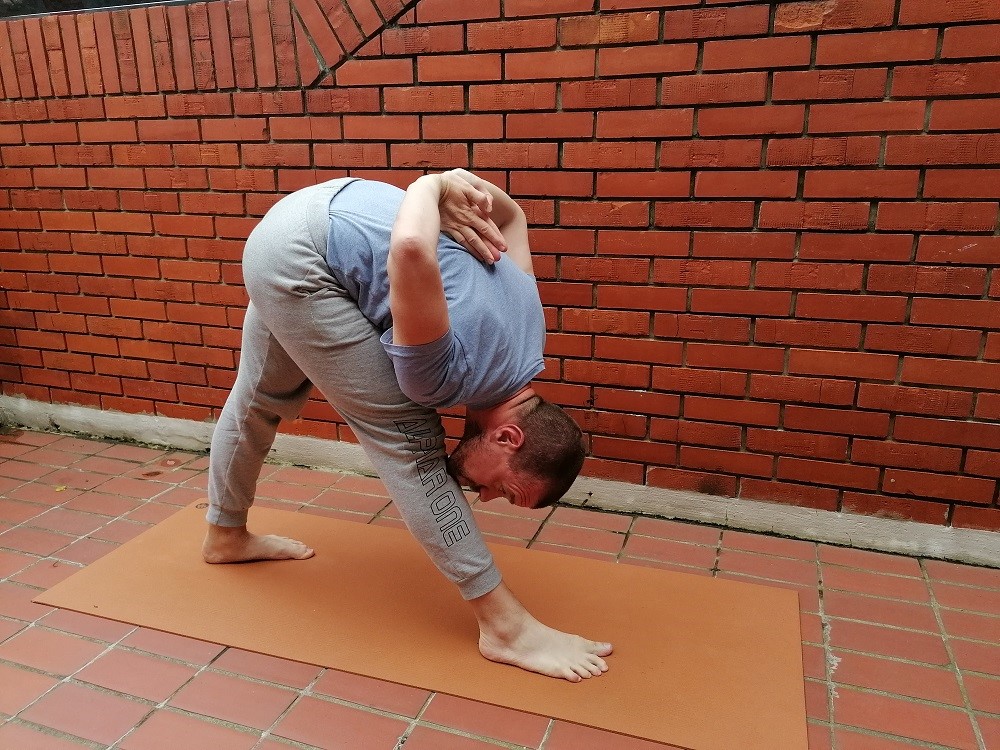
This means that the entire foot is activated. In order to be calm when performing the pose itself, it is important to activate all the toes of your feet. Squeeze the toes of the feet as if you want to grab your yoga mat with them. It is important to fully contract the calf, to feel the kneecap moving upwards, and fully contract the thigh. In this way, your landing leg will be fully activated and the necessary sense of stability will be established that is needed when performing the position itself.
In addition to the active landing leg, it is important that the hamstrings are finely stretched. If they are not, you will not be able to perform the pose fully.
In addition to the lower body, the position of the upper body is also important. As you rotate your upper body towards the landing leg, you should try to keep your hips in line as you begin the downward bend. When going down, the back should be completely straight so the descent does not come from the upper part of the body but from the hips.
When it comes to the benefits of the pose itself, it is excellent for stretching and opening the hips, back, shoulders, hamstrings, and glutes. It is also good for strengthening the legs and joints, both on the legs and on the hands (if the pose is performed completely with the palms together behind the back). This pose further develops the sense of balance.
The full pose means that the chin falls on the knee. In this case, there is a very intense massage of the stomach organs, so the pose itself is excellent to improve digestion.
Certain studies indicated that this is an excellent pose for people that are suffering from arthritis affecting the neck, shoulders, and joints.
Even the pose itself is recommended for the female population during the menstrual cycle. Since the internal organs of the stomach region are massaged, the same massage reduces the so-called menstrual cramps.
VARIATIONS
If the practitioner’s body is not yet ready to perform the pose completely, there are two variations that the practitioner can practice and thus prepare the body to enter the full position.
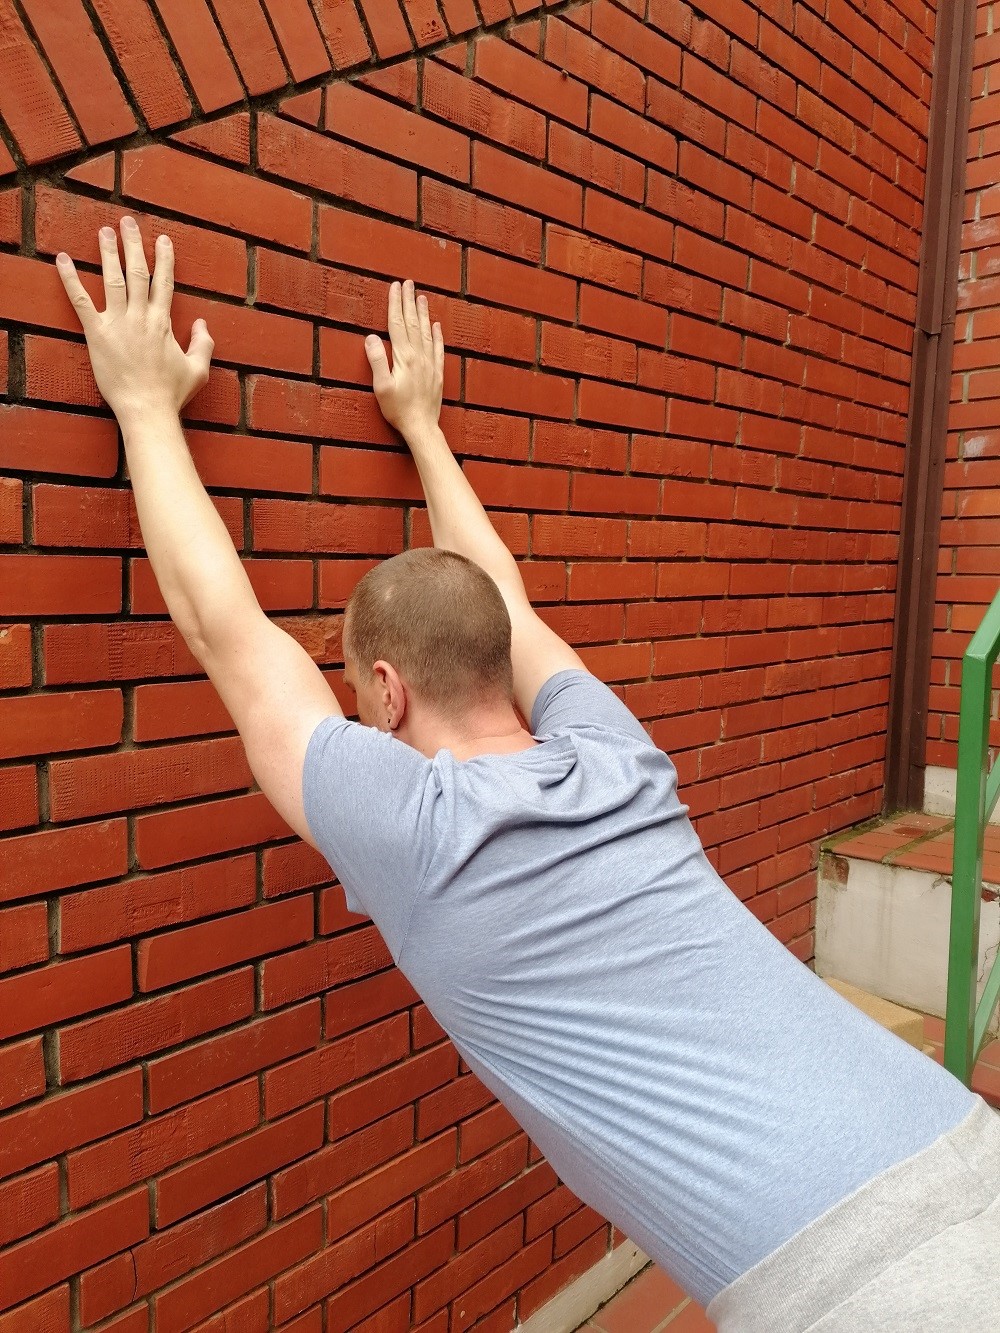
The first variation implies that the practitioner uses the wall as a support. With both feet facing the wall and toes pointed, perform a hip rotation to the landing leg. Thus, the entire lower body is in full position to perform the pose.
Rest your palms on the wall in such a way that your arms are fully extended above your ears. The hands are shoulder-width apart, the palms rest on the wall along the entire surface. Stay in that pose for between 5 to 10 breaths. After that, gently lower your hands down, so that they reach a position where they are in line with your ears. The palms are still resting on the wall with their entire surface. Your back is always straight. Also, stay between 5 to 10 inhales and exhales. The third part of this first variation involves gently lowering your hands down the wall as far as you can. The back remains straight. You will feel a fine stretch in the hamstrings. Stop in a position that pleases you and stay in it between 5 to 10 inhales and exhales. With a slight inhale, come out of the pose, lifting the upper part of the body and then switch to the other side.
Another variation involves using blocks. Since the blocks have three heights, this variation has three positions. Feel free to start with the easiest one using the highest block height in it. Place the blocks in line with the toes. Place your palms on the blocks on the entire surface. Your back is straight, your legs are tight. Stay between 5 to 10 inhales and exhales. If you can, lower the blocks to a lower height. Of course, after 5 or 10 inhales and exhales, lower the blocks to the lowest height, if you can get into this pose.
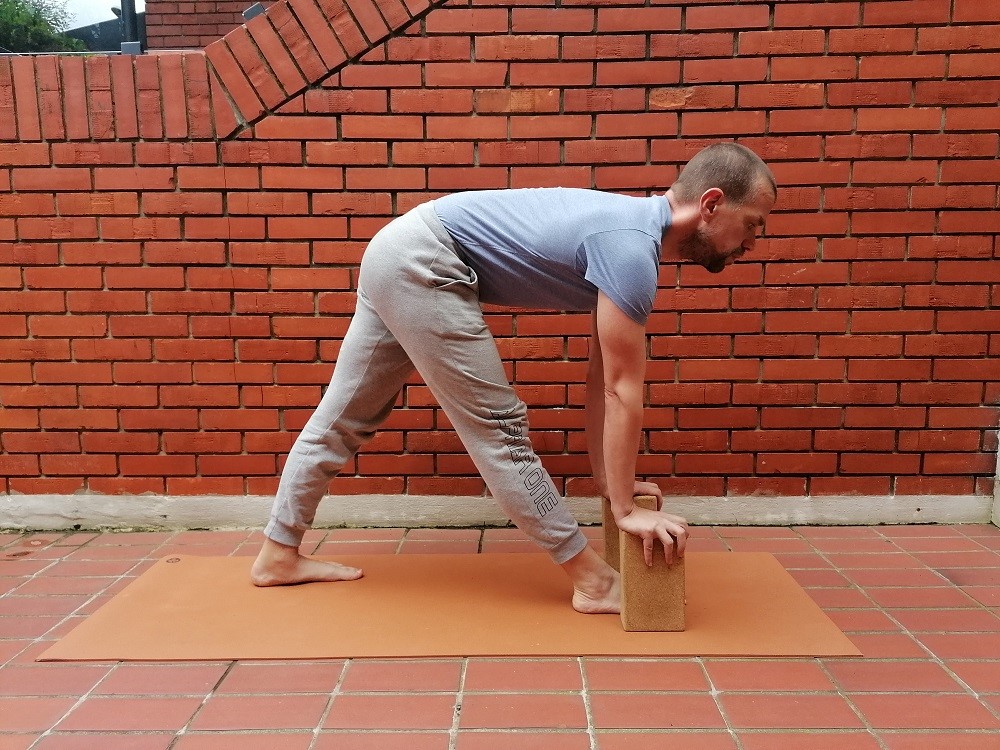
During each of these poses in this variation, make sure your back is straight the entire time and your legs are tight. If you are unable to comply with these two alignments at the moment, do not force an entry into a certain pose.
CONCLUSION
Parshvottanasana is a pose that implies the readiness of the practitioner on several levels. It implies a developed sense of balance, stretching, and openness of the body. It also implies a developed sense of presence. If there is no developed sense of presence and awareness of one’s own body, injuries can easily occur when practicing this pose.
This can happen if the back is not completely straight. If the back is not completely straight during the practice of this pose, a back injury may occur. Likewise, if awareness of one’s own body is not fully developed, it is very easy to injure the knee tendons. In the worst case, this attempt can lead to tendon rupture.
Do not do anything beyond the limits of your body. Do each pose within the limits of your body’s comfort.