This pose is present in most styles of yoga. However, it is most commonly used in Ashtanga and Vinyasa yoga.
It should also be noted that this pose is not mentioned in the old texts related to Hatha Yoga. Parsva in Sanskrit means side, and Kona means corner.
How It Is Performed
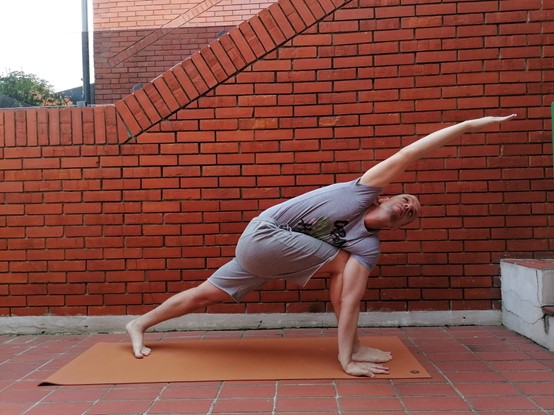
The entire side involved in this pose is stretched during its practice, from the heel to the calf, knee, thigh, hip, waist, armpit, and fully stretched arm (it is usually said that it represents a natural extension of the spinal column), all the way to the finger tips of the outstretched hand.
When entering this pose, it is important first to consider the position of the feet. When stretching the right side of the body, the left foot is rotated 90 degrees. Make sure to step forward with the leg on the side of the body that is being stretched. The distance between the feet should be between 4 and 5 feet. Everything depends on the proportion of the body of the individual. In the case of stretching the right side of the body, after turning the left foot to 90 degrees and stepping back with the right foot, turn the right foot inward for 30 degrees. In this way, better support is achieved for the practitioner. Otherwise, the stability of the pose itself would not be achieved.
The front leg, in this case, the left, bends at the knee. The correct pose means that the thigh of the left leg is in line with the yoga mat. The left knee should be precisely above the ankle joint of the left foot. One small guideline can very quickly tell you whether the knee position is good or not. Direct your gaze toward the left knee. If the knee hides the big toe of the left foot and all the other toes are visible, then you are in a good position regarding the thigh, knee, and ankle joint position. It is imperative that the knee does not go in front of the ankle while practicing this pose. In this case, there may be an eventual injury to the knee ligaments.
It is important to do an excellent weight transfer on both your feet during this pose. Become fully aware of the transfer of your body weight to the toes of both feet, the soles of the feet, and the heels.
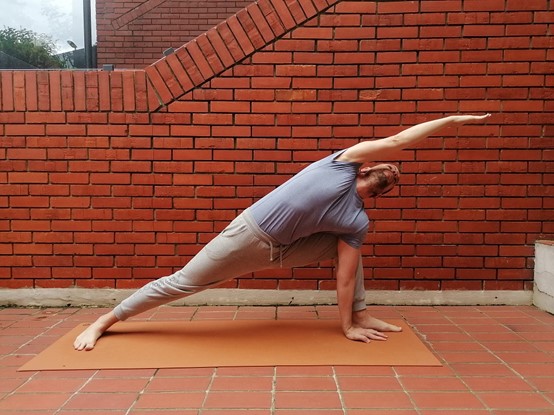
When the right side of the body is stretched, the left palm falls on the yoga mat. This is, of course, understood if the pose is performed completely. Even in that case, there are variations. The left palm can land on the inside of the left foot or the outside of the left foot. The left hand is fully extended. It is important to achieve stable support of the left palm with a yoga mat. If necessary, the left palm can also be placed on the block, which is another possible variation. There is also the possibility of bending the left arm at the elbow and resting the elbow and forearm of the left hand on the left thigh.
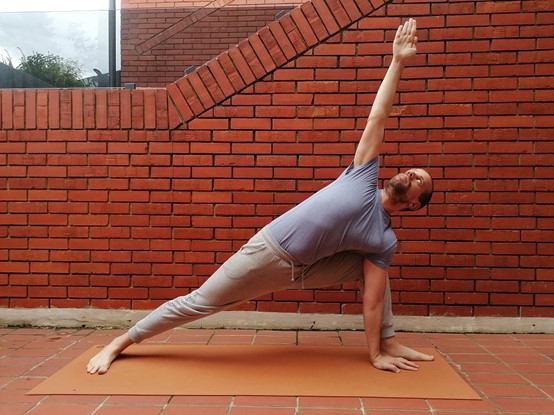
After positioning the legs and the left arm, which serves as a support, the right arm is stretched. As I mentioned a moment ago, it represents the extension of the spinal column. The full pose implies that the practitioner directs his gaze toward the armpit of the outstretched right hand.
If the practitioner has any problem with the right arm, there is an option to lower it along the entire right waist or rest it on the right waist, with the fingers pointing down the right leg.
Suppose the practitioner’s balance is challenged by the gaze toward the right armpit (some practitioners have a problem with the center of balance). In that case, the gaze can be freely directed downwards, toward the left hand, which is resting on the yoga mat or block.
This pose can be started from the pose of the mountain. The pose can end in a warrior two.
A very important note to fully perform this pose is that the chest must be fully stretched. More precisely, it must be stretched and facing upwards.
Practitioners usually make a mistake in the setting when they want to place their left palm on the yoga mat, although their body is not yet ready for such a pose. In the desire to lower the left palm on the yoga mat, the chest turns downwards even though the body is not yet ready for that pose. This way, the body’s right side will not be fully stretched. Therefore, it is always better to use a left palm block or to bend the left arm and place the elbow and forearm on the left thigh.
It is also important that the weight transfer is done properly. In this case, most weight should be transferred to the feet and not to the left palm.
Limitations and Benefits
I would definitely not recommend this pose if you have problems with blood pressure (low or high). Also, avoid this pose when you have headaches or migraines.
Practitioners with knee, hip, neck, or shoulder injuries should practice this pose with much awareness.
This pose is excellent for skiers, as it strengthens the thighs, knees, and ankles. The pose gently stretches the hamstrings, groin, spine, chest, and shoulders.
When talking about the therapeutic value of this pose, it is excellent for sciatica, constipation, menstrual pain, and lower back pain.
Conclusion
If you are encountering this pose for the first time, please do it with a lot of awareness. Do it gradually. First, address the condition of your lower body, legs, and feet.
By all means, use the block if you feel you need it. Do not allow your ribcage to rotate downward.
If you have done this pose completely, there is always a challenge.
As far as this pose is concerned, the question is its continuation, more precisely, the pose under the name Parivrtta Parsvakonasana. In this pose, there is more rotation in the spinal column.
Of course, if you haven’t mastered the basic pose yet, don’t try this advanced variation. In that case, you will only injure yourself more easily. Be aware of your body’s current limitations.