Trikonasana is a Sanskrit word which is a combination of two words – trikona and asana. Trikona means three corners or a triangle, while asana means pose.
A Deeper Insight in Trikonasana
The triangle pose is one of the starting poses in most yoga styles. However, since it is a pose that involves fine stretching of both the upper body and the lower body, it can be very challenging for people who are just starting their yoga practice.
Since it is a standing pose, you should bear in mind that a developed sense of balance is implied, especially if the pose is performed entirely with the gaze directed at the fingers of the raised hand.
Practicing this pose activates the following chakras: the root (Muladhara), sacral (Swadisthana), and heart (Anahata) chakra.
The elements that are associated with this position are air, water, and earth.
By practicing this pose, you achieve unity in the relationship between your mind, spirit, and body. Observing this pose through symbols, it signifies the past, present, and future. The back leg that provides stability and essential roots in this pose represents the past. The upper part of the body which extends in the direction of the other leg represents the present. The front leg and the arm which are stretched upwards represent the future.
How to Practice the Triangle Pose
In order to fully perform the triangle pose, your hips need to be open enough; the same goes for your chest and shoulders. Flexible and finely stretched quadriceps and groin are also integral to fully perform this pose.
Therefore, if you are thinking of including this posture in your practice, we definitely advise you to dedicate some time to the following postures:
These poses help you prepare your body to properly perform this pose. You can practice these following poses in the order listed, as one mini-sequence:
- Runner’s Pose (Utthita Ashwa Sanchalanasana)
- Warrior 2 (Virabhadrasana 2)
- Standing Downward Bend (Prasarita Padottanasana)
- Stretched side angle with elbow on knee (Utthita Parsvakonasana)
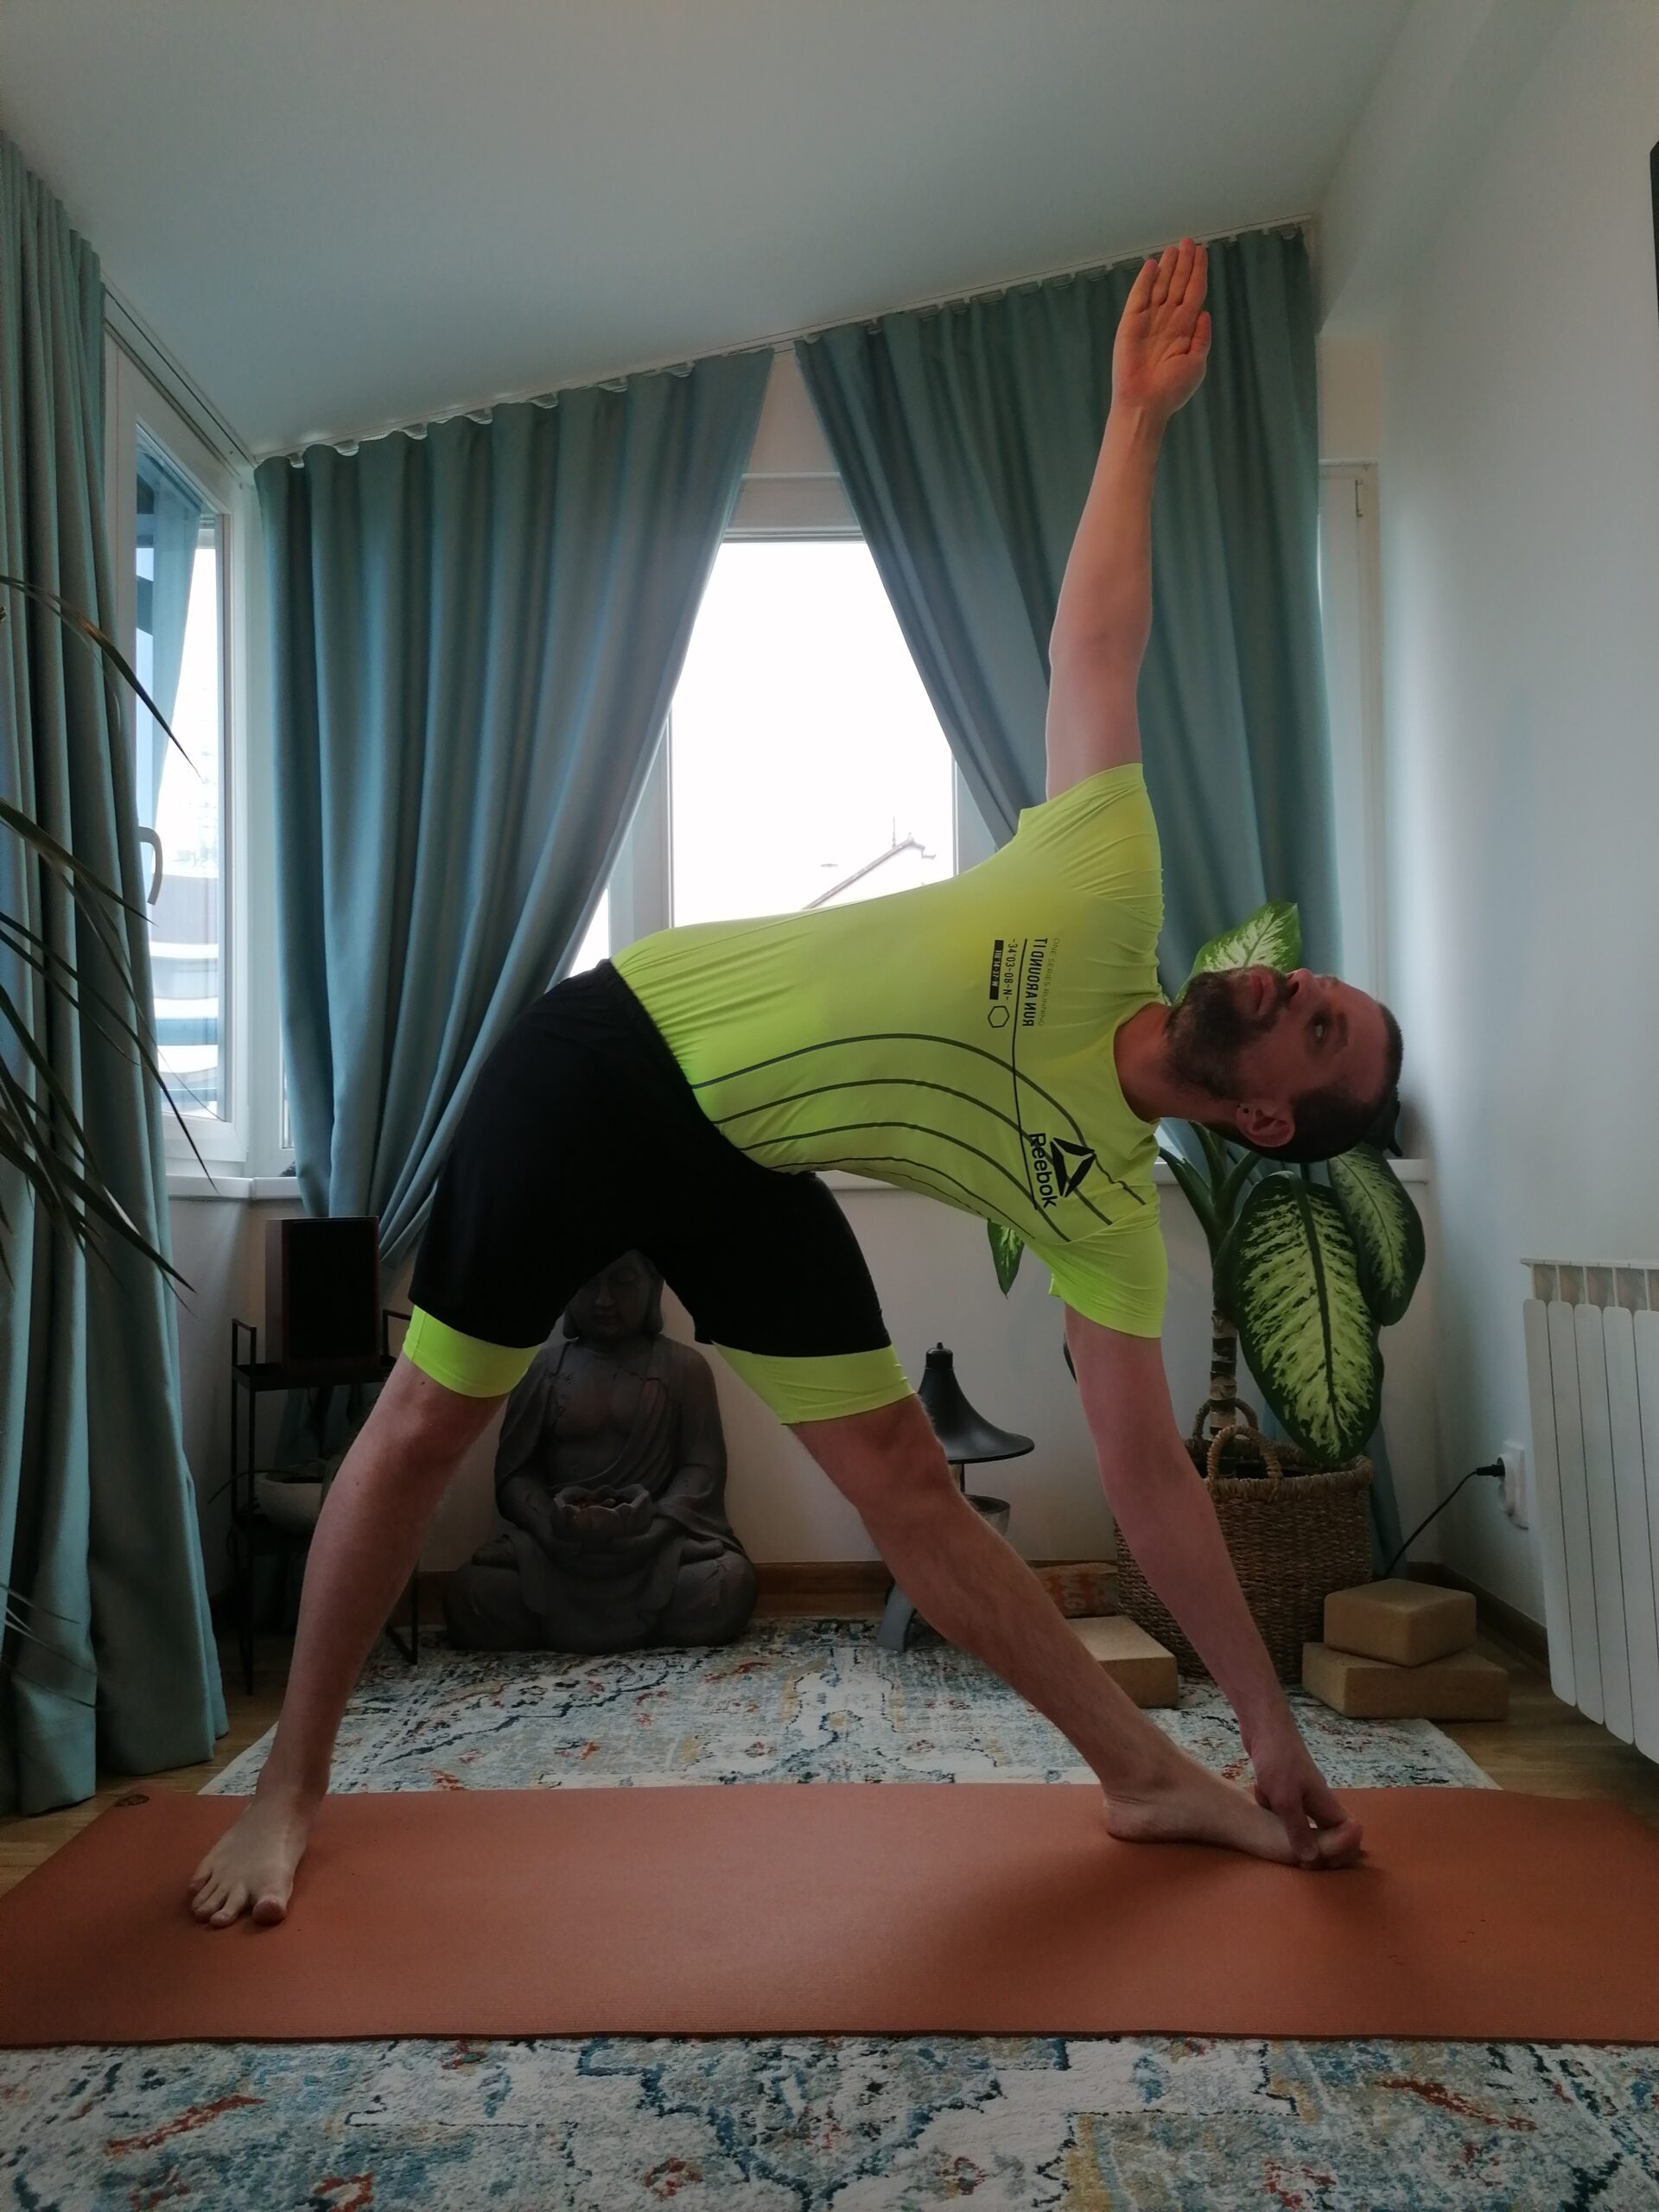
Given that it is a standing pose, the use of bandhas (Uddiyana and Mula) is a given. Both legs should definitely be active during the entire pose. Don’t forget to keep your toes active as well, as if you are trying to grab the yoga mat with your toes.
The upper part of the body should not go into the space. That is, the lower hand should be next to the foot which is rotated ninety degrees on its inner side.
If your right foot is rotated ninety degrees, the right palm comes down on the inside of the right foot or grab the right ankle or the right big toe. Try to make sure that the toes of the left foot are slightly turned inward, to the right, so that they do not go into the opening on the left side. This arrangement of the feet is very important to achieve the balance of the whole body while performing this pose.
Pull your upper body back as far as possible, opening your left hip; more specifically, the lower hip. In this case, the right hip is thrown forward while the left hip is pulled back.
The left hand extends all the way up, with the fingers also extending upwards, as if to reach for something within reach.
As far as the gaze is concerned, it is aimed at the fingertips of the outstretched hand (in this case, the left hand). If you can, try to stay in the pose with your eyes closed. For some people, even looking up is a challenge since most people initially lose their balance when looking up. So, if closing your eyes makes you feel like you’re losing balance, feel free to open them. Time will take its toll, and your balance will improve.
If you are closed in the hips, chest, and shoulders, do not limit yourself by not practicing this pose. Without thinking, start practicing it using the blocks as a support during the performance. Some people will need a few blocks at first. Some of my trainees used three or four blocks at the beginning of their practice when it comes to this pose. Over time, that number will decrease. Just practice and be patient.
In addition to the blocks, you can also use a chair as a support. More precisely, use the seat part of the chair as a support for the palm of the lowered hand.
Over time, when you completely mastered the initial triangle pose, you can try to include more demanding poses in your practice such as the twisted triangle, elongated triangle, or inverted triangle pose.
Benefits of Practicing Trikonasana
Practicing the triangle pose strengthens and finely stretches your thighs, groin, and hamstrings. Your knees will thank you in a big way, too.
With regular practice, your chest will fully open; the same goes for your shoulders, hips, and entire back.
Keepin mind that it is a standing pose. During the performance of the pose itself, your ankles will get stronger and gain flexibility and mobility.
We definitely advise you to do the micro-movements for the ankles before practicing this pose to warm them up nicely and ensure the necessary mobility and flexibility.
When the pose is performed completely correct, the elasticity of the diaphragm increases. This also leads to better functioning of all respiratory organs. The breathing process itself works much better than before. This pose is excellent to establish better circulation throughout the body. It is recommended, especially for people who spend most of the day sitting.
This pose is also good from a therapeutic point of view. It is excellent for people who deal with neck pain, sciatica, osteoporosis, and mild depression.
On an energetic level, the triangle pose is a very energizing asana, an asana that is also very relaxing and is recommended for stress relief.
Conclusion
Although this pose doesn’t seem too demanding at first glance, don’t let that fool you. You enter this pose with full awareness; use blocks or a chair if you feel that you need them. Do not force your body if it is not yet ready for the full pose.
If you are new to this pose, practice the mini-sequence that we indicated at the beginning of this guide. Don’t forget about them. Preparatory poses are, in most cases, very important in order to perform certain poses correctly.
Always remember to practice the preparatory poses and use blocks and chairs. Don’t hesitate. Listen to your body, and progress at your own pace.

